Getting Ready: In practising coding, we will:
- Identify the features of simple programming.
- Work with patterns and games to learn simple programming.
- Identify a program for creating stories, games and animations.
- Create simple animations using simple programming.
- Learn Scratch and use it to create simple stories, games and animations.
- Use Scratch to find solutions to local problems.
- Find out more about Scratch and share this information with others in our communities. In this way, we will develop interest and appreciate the role of Scratch and other coding applications in everyday life.
- Use Scratch to generate some animated graphics.
- Note that Scratch is one among many other simple programming tools. Find out others. Share the information with other learners.
- Programmers use special fonts for neatness. Find out more. Research on the Internet.
Activity 4.14: Learning new words

Write the words in your journal or in flashcards. Find out their meaning. Share your findings with others.
Learning Applications that use Simple Programming
What do we already know?
In Grade Four, we studied various digital devices and coded patterns in nature. We know how to interact safely with digital devices in our localities. We can also interpret simple codes and patterns.
Activity 4.15: Discovery corner: What is programming?
What is programming? Here is a simple explanation.
Computers solve problems for us. All we need to do is create a language they can understand. We can then give the computer instructions, and it solves a given problem.
There are languages that computers understand. Computer programmers create these languages.
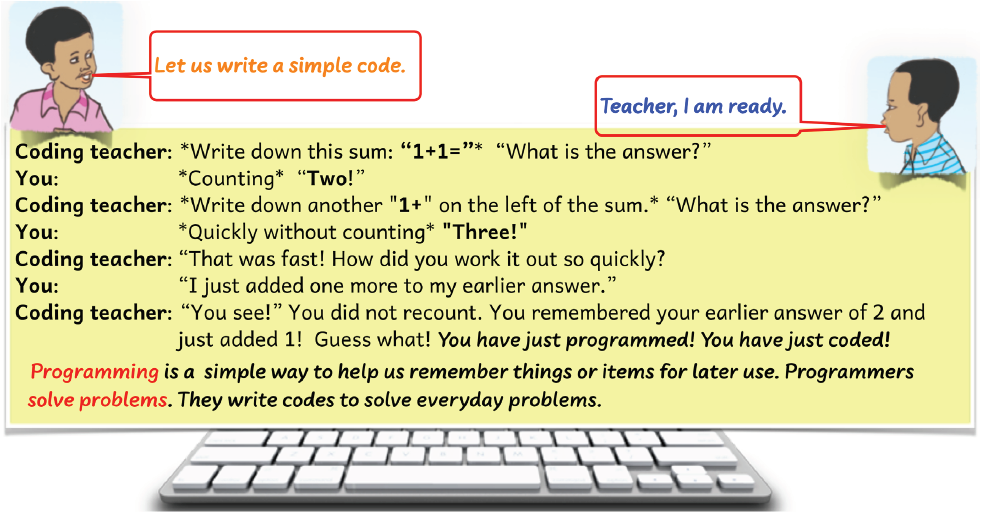
When you create a program, we say that you are coding. Codes are the steps the computer follows to solve a problem. The instructions must be clear. When you create these steps, we say that you are programming or coding.

Activity 4.16: Writing a simple code
There are many coding sites for young learners. Search the Internet for [coding for kids].
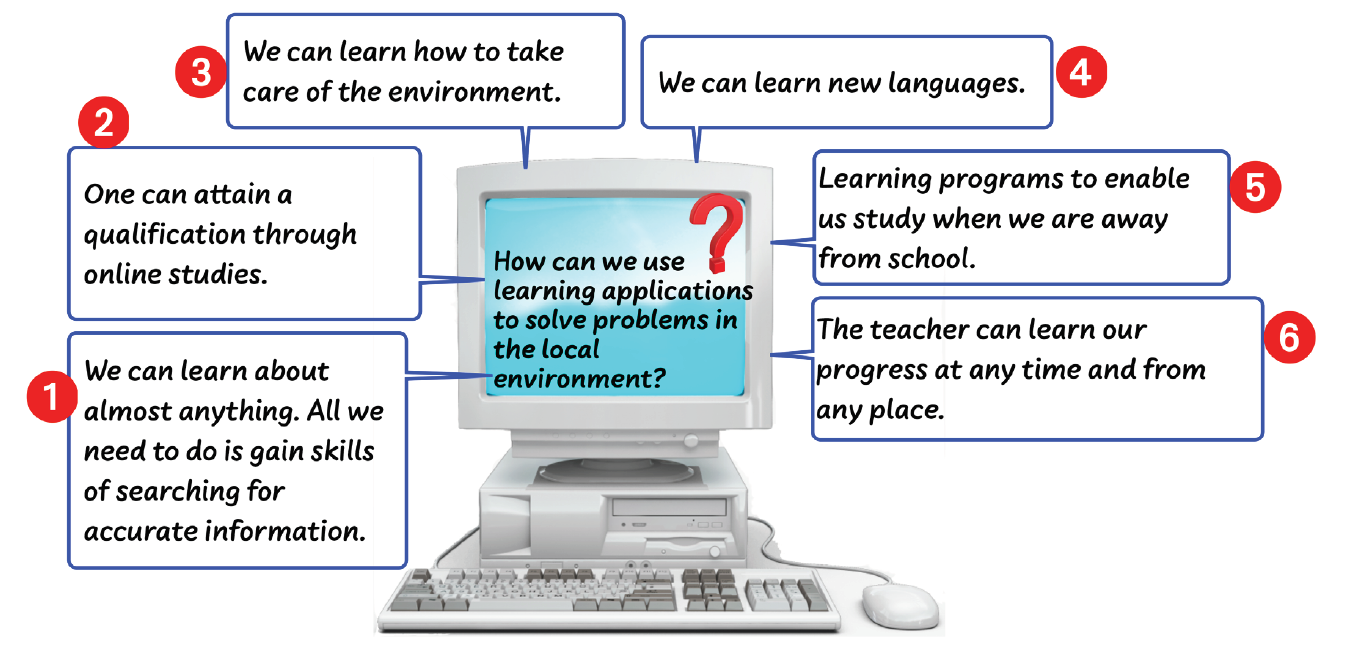
Using learning applications to solve problems in our local areas
Activity 4.17: Using learning applications
Work safely in pairs. Find out how we can use learning applications to solve problems in our local areas. Add to those listed below.
Activity 4.18: Introducing Scratch
Work safely in pairs. Read this short story. Talk about it.
Bingwa and Neema were using a laptop in the school computer lab. Neema showed Bingwa a program with the Cat Cartoon shown in the picture. They started running it. Bingwa learnt from Neewa how to create simple games with it.
We will learn how to create simple stories, games and animations.
To animate, you use a computer program to create moving images. We will use a simple program called Scratch. you will enjoy the lesson.
In our learning activities with the Scratch program, we will do simple programming.
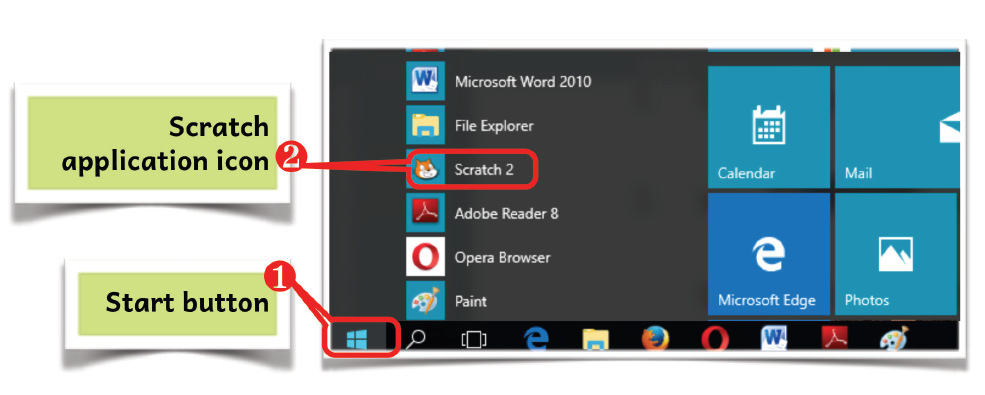
Activity 4.20: Starting Scratch program from the Start Menu
- Click the Start button as shown below.
- Select "Scratch 2" from the resulting menu.
- You can also start the program by double-clicking on its shortcut icon if it is on the desktop.
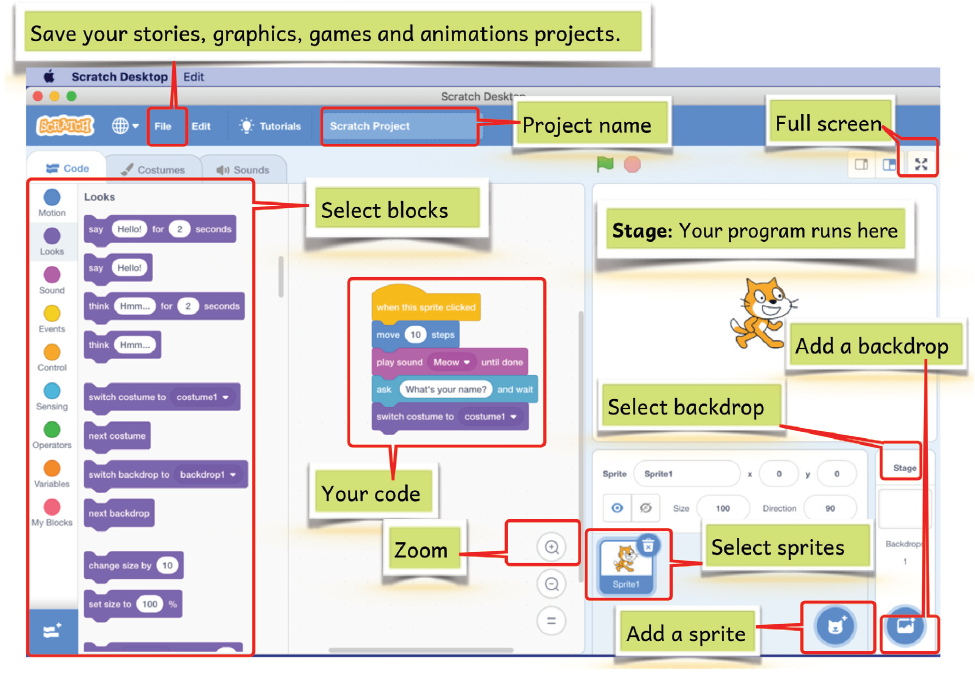
Activity 4.21: Identifying the different parts of the Scratch window
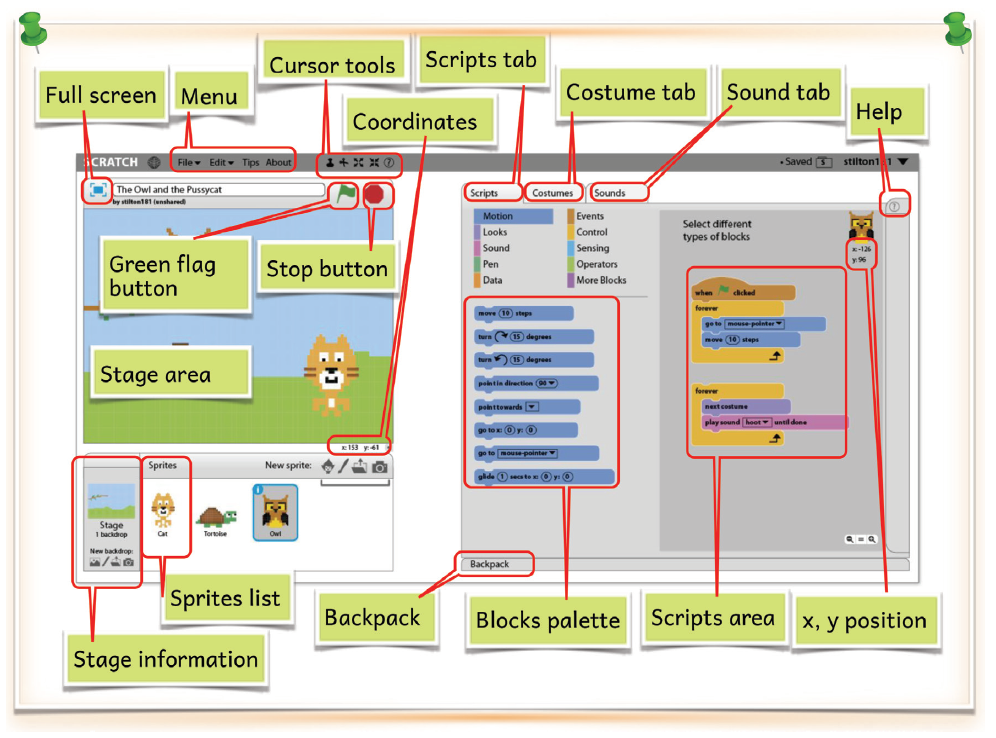
When you run the program, the scratch window will open. Its appearance depends on the version of Scratch you are using.
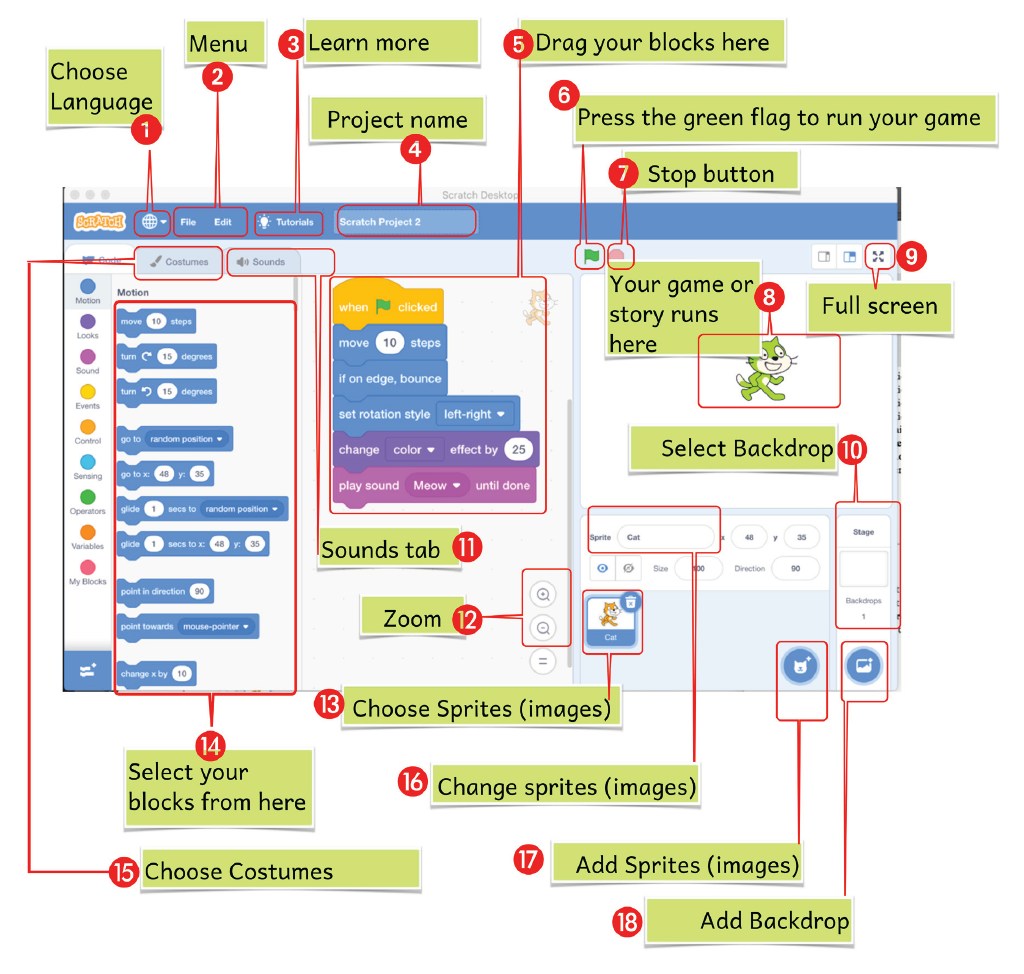
The picture below shows the Scratch Window. Study its various parts.
Learn more. Grow. Share the knowledge with your family and community members
About Scratch Program
- Scratch is a computer programming language. Scratch allows you to code simple programs.
- You can use Scratch to create simple stories, simple graphics and simple animations.
- Scratch can be downloaded for free.
- The downloaded version does not require Internet to run.
- You can open by double-clicking the Scratch application icon if it is on the desktop.
- Sprites are images. Scripts are instructions.
- You can open the Scratch Application program by clicking the Start Button then selecting Scratch.
The Scratch Window
When you open and run Scratch, a window screen opens. This screen has everything that you need to create and run a Scratch game or project. The Scratch window is divided into different areas. You run your projects in the area called stage.
The sprites (or images) list is on one side of the window. You create instructions on the area called the blocks palette and the scripts area. You will use Scratch to code. You will use blocks. You will drag and drop them to create stories, graphics and animations.
Scratch will enable you to control sprites. A sprite can be an object, a person, or an animal. When you place the blocks in the right order, you will instruct your sprite to act. When you create movement, you will have animated the sprites.
Activity 4.22: Study the areas of the Scratch window
Find out: Which version of Scratch is on your computer device? The window you see depends on the version of Scratch you are using. The features are, however, the same.
Activity 4.23: Identify the different areas of the Scratch window
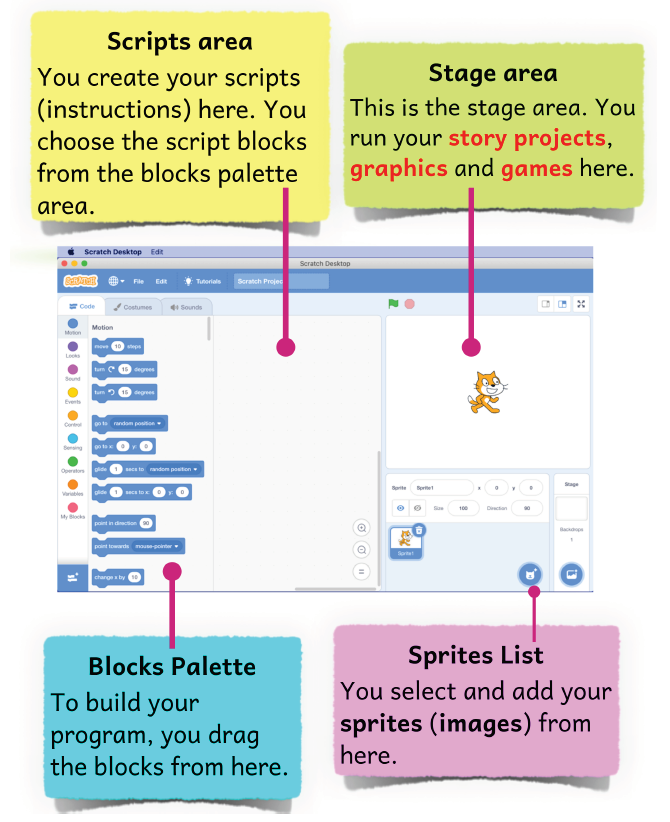
Activity 4.24: Identify the parts of the Scratch window
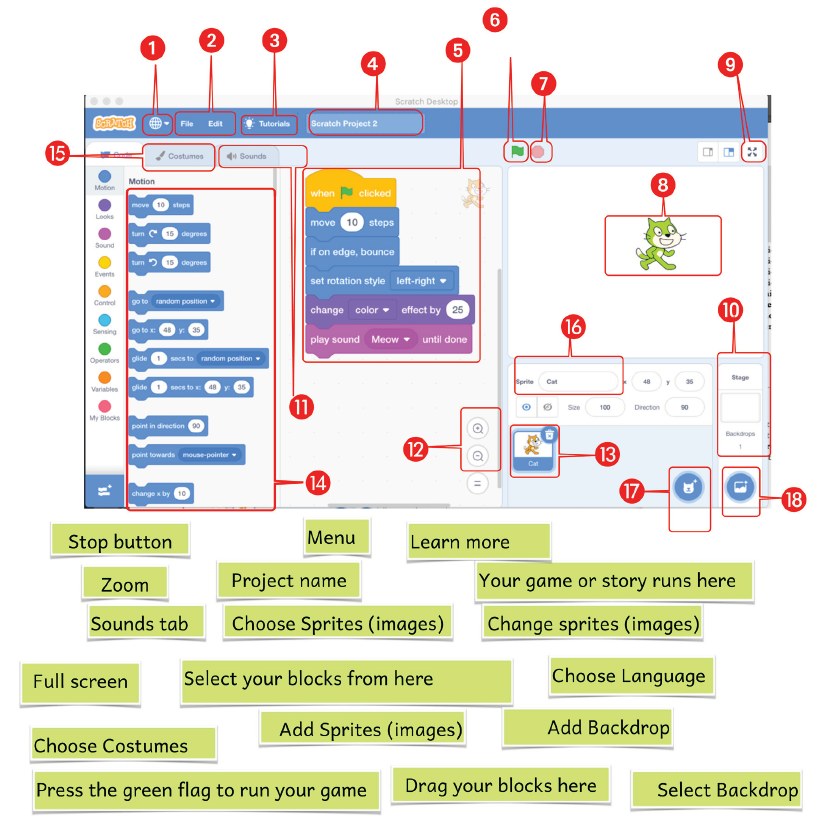
Work safely in groups. Identify the various parts of the Scratch window numbered 1 to 18.
Discover the different features in Summary: Scratch features.
Instructing Sprites (images)
Sprites are the images you use when coding with Scratch. You use scripts to control the movement and actions of your graphics and animations.
Scripts are step-by-step instructions. You create them to make your sprites (images) act in the way you desire.
You can create a story, a graphic, or an animated game with lots of sprites. You can create instructions to make the sprites in your story, graphics or animations project to do the following:
- Move around.
- Change their appearance.
- Be moved about by the player.
- Talk in speech bubbles.
- Play sounds and music.
- React when they touch other things.
Creating Simple Graphics
Activity 4.25: Identify sprites to create simple stories, graphics and animations
- Work safely in pairs. Open the Scratch program. Work in turns. Allow each other a chance to click on sprites.
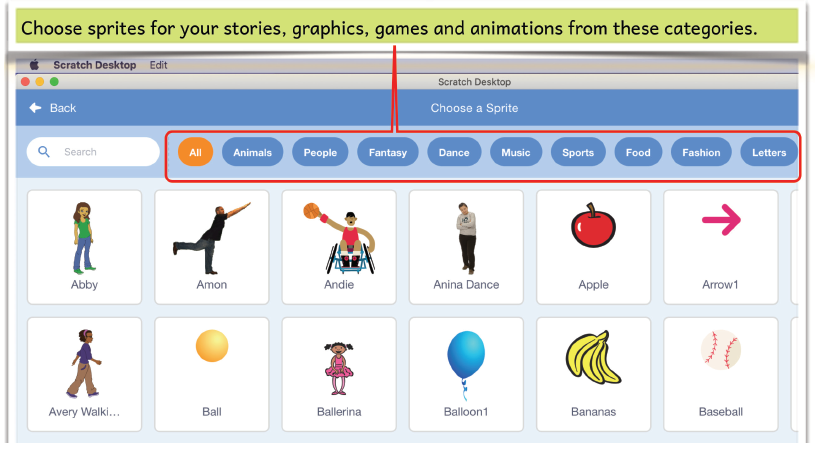
- Click on the Sprite Library icon. Look at the different sprites from different categories.
- Scroll down to see all the sprites. Change the categories name from All to Animals and others. The selection, “All” displays all the sprites available.
Activity 4.26: Use sprites to create simple stories, graphics and animations
- Work safely in groups.
- Open the Scratch Application program.
- Click on the Sprite Library Icon.
- Which version of Scratch are you using?
- Depending on the version, identify and note down four Sprites under each of the following categories:
- People
- Animals
- Food
- Letters
- City
- Music
- Sports
- Fantasy
- Fashion
- Compare your lists with those of other group members.
Activity 4.27: Inserting Sprites in the Stage Area
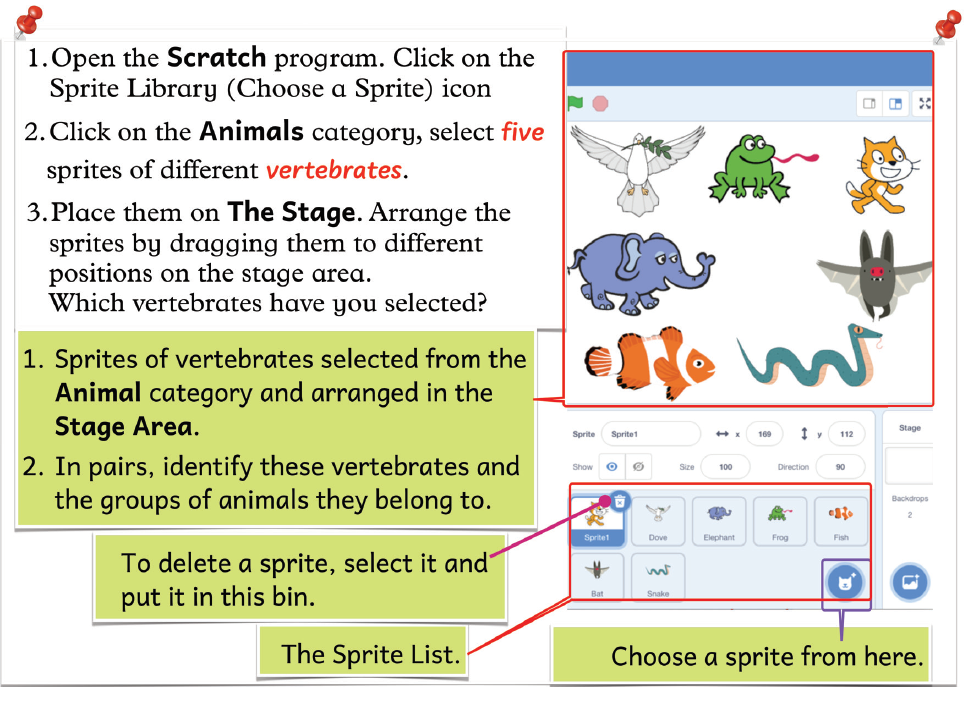
Online Video Tutorial
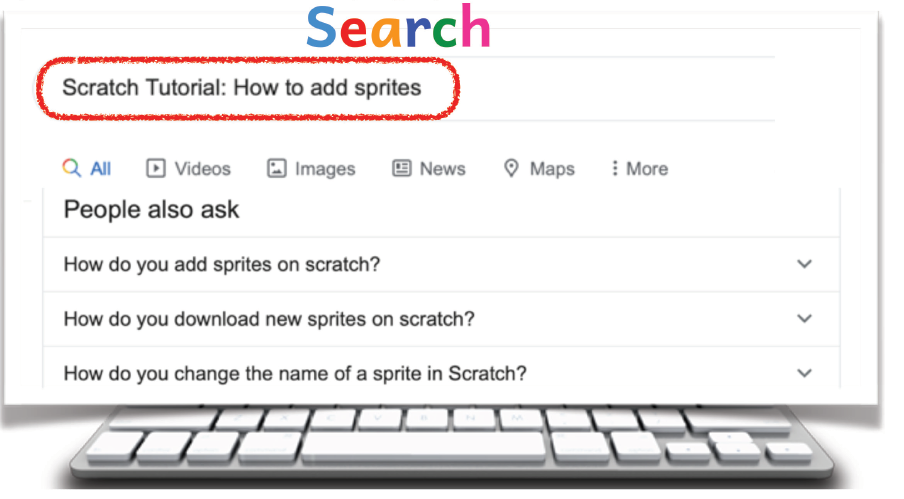
Activity 4.28: Discovery corner: Inserting Sprites in the Stage Area
Use the Internet to search for online video tutorials. Find out how to add sprites and how to create simple graphics.
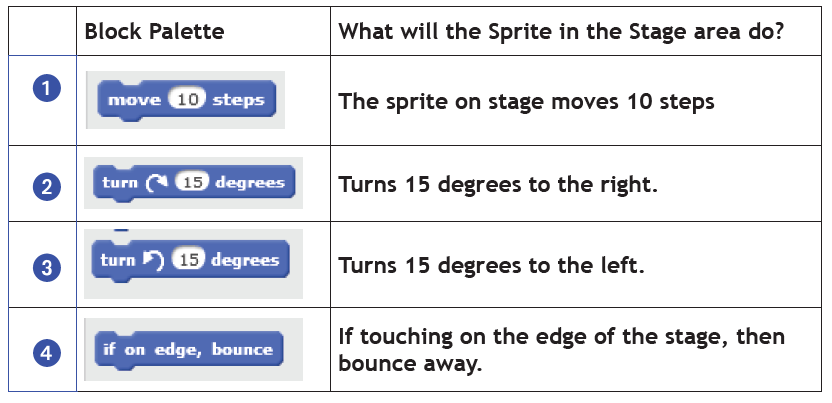
Activity 4.29: Using block palettes to control Sprites
Work safely in pairs. Study this picture. Talk about it.
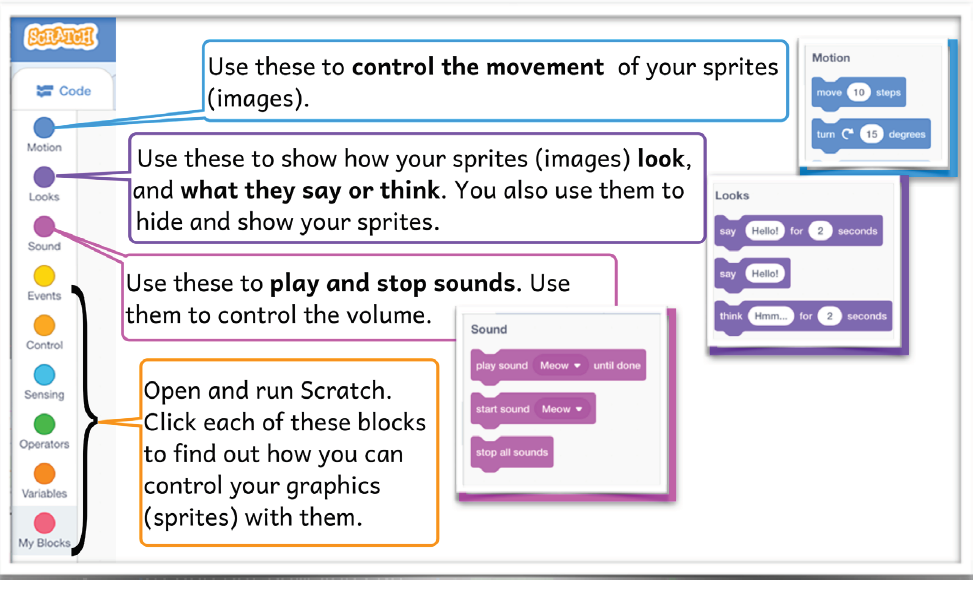
Open and run Scratch. Point at different blocks. Talk about what you see.
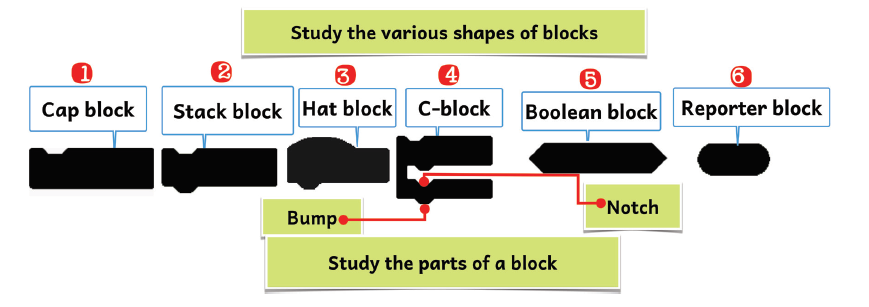
Activity 4.30: Study the shapes of block palettes
- Work safely in pairs.
- Study this picture.
- Talk about it.
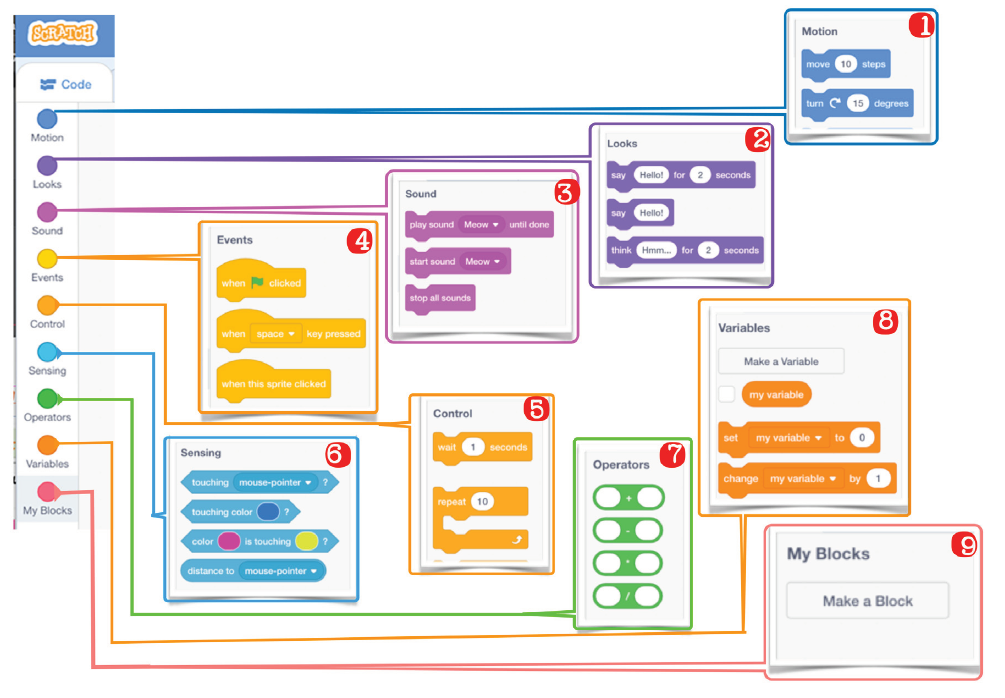
- Open and run Scratch.
- Point at different blocks.
- Talk about their shapes.

Learn more. Grow. Share the knowledge with your family and community members
- Blocks are shapes that you use when you create codes in Scratch.
- The blocks fit like a puzzle game. They connect to each other like a jigsaw puzzle.
- They have different special shapes.
- You connect them to fit into each other in order to give instructions to your sprites (images).
- When you connect them, they form blocks called scripts. There are many categories of blocks.
Animating Graphics. Creating Movement of Graphics
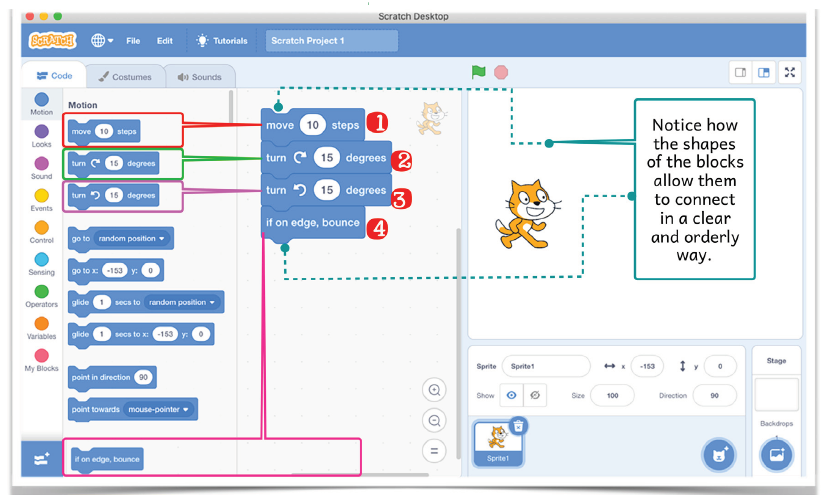
Activity 4.31: Arranging blocks to create a clear and orderly action
Work safely in pairs. Open and run Scratch.
Click on the Motion Block Palette. Study these blocks. Practise to drag the blocks to the Stage Area. Do it in turns.
Note that the instructions written on each block will be performed to act on a Sprite.
Activity 4.32: Identify the blocks with notches and bumps
- A bump must match a notch.
- Not all blocks have notches.
- Not all blocks have bumps.
- A notch connects into a bump when arranging blocks to create an action referred to as script.
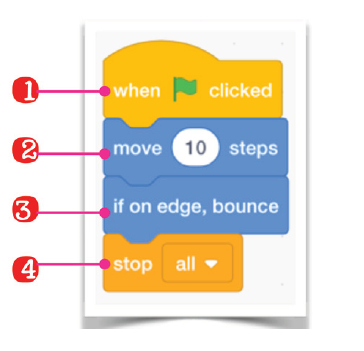
1. Which blocks have a notch?
- 1
- 2
- 3
- 4
2. Which blocks have a bump?
- 1
- 2
- 3
- 4
3. Which blocks have both a notch and a bump?
- 1
- 2
- 3
- 4
4. Which block has only a bump?
- 1
- 2
- 3
- 4
5. Which block has only a notch?
- 1
- 2
- 3
- 4
Activity 4.33: Arrange blocks to create clear and orderly actions
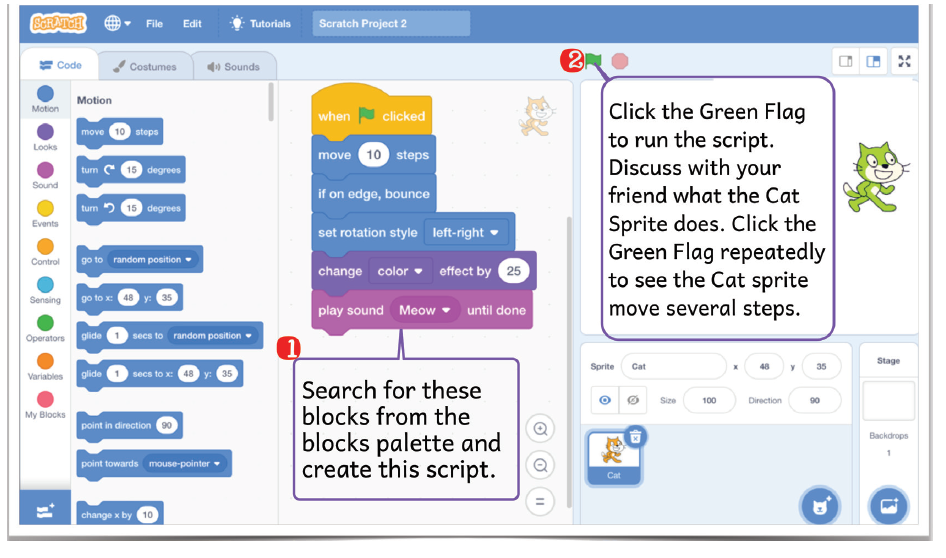
Click inside the "Move 10 steps" Block. Change 10 to a different number, for example, 50, 100 or 200, one at a time as you click on the Green Flag button. Discuss with your friend what happens to the sprite.
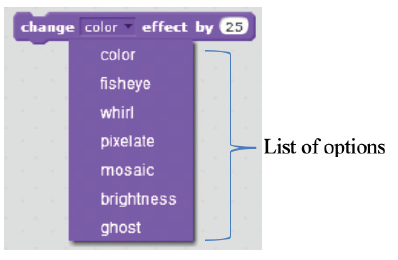
Click the arrow next to the color in change (color) effect by (25) block.
Select one of the options, for example, fisheye and effect from 25 to 100.
Click the Green Flag button repeatedly to see Cat1 sprite change in appearance.
Activity 4.34: Arrange and control blocks to create clear actions
Open the Scratch program. Insert a Sprite of your choice. Choose the following listed blocks from the block palettes. Create a script to be applied on the sprite.
- Motion: Any 2 blocks
- Looks: Any 1 block
- Events: Green Flag block
- Control: Any 1 block
Activity 4.35: Arrange and control blocks to create a clear action
- Open Scratch program. Insert Devin Sprite shown in picture 1.
- Create the script shown in picture 2.
- Click the Green Flag button to run the script.
- Discuss with your friend what happens to Devin Sprite.
- Press the space bar key to see Devin sprite move as a message is displayed.

Learn more. Grow. Share the knowledge with your family and community members
- You can use the Space bar key to run the Script.
- You can change the number of steps that you wish the sprite to move in the motion blocks.
- You can change the number of seconds that you wish the sprite to move in the motion blocks.
Creating simple animations in Scratch
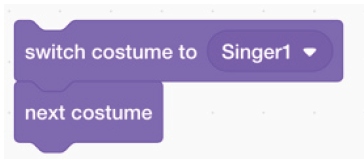
The simplest way to create animation is to use the “switch costume to” block and “next costume” block shown in this picture.
Activity 4.36: Creating a Ballerina Dance Game Animation
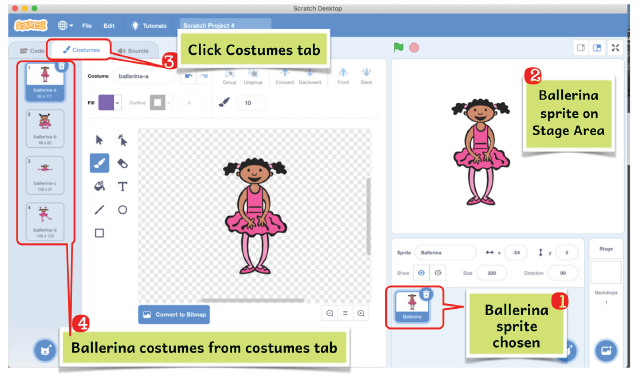
- Open and run Scratch program and select Ballerina sprite (1).
- Ballerina sprite will be displayed on the Stage Area (2).
- Click on the Costumes tab to display the different costumes for Ballerina sprite (3).
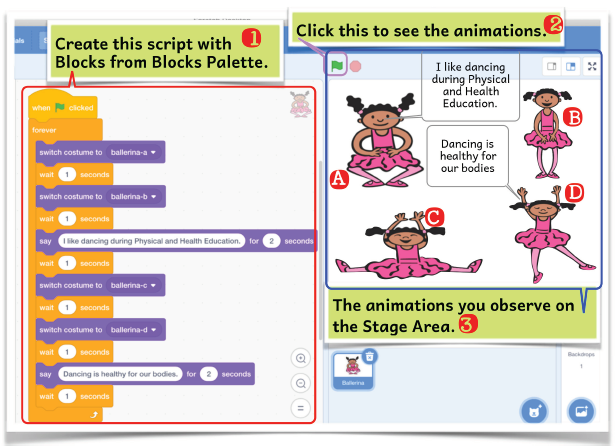
- Create the script as shown below in Label1. Save it as Ballerina.
- Click the Green Flag Labelled 2 (below) to animate Ballerina Sprite. The Sprite is animated. Label 3 shows some of the views you will see.
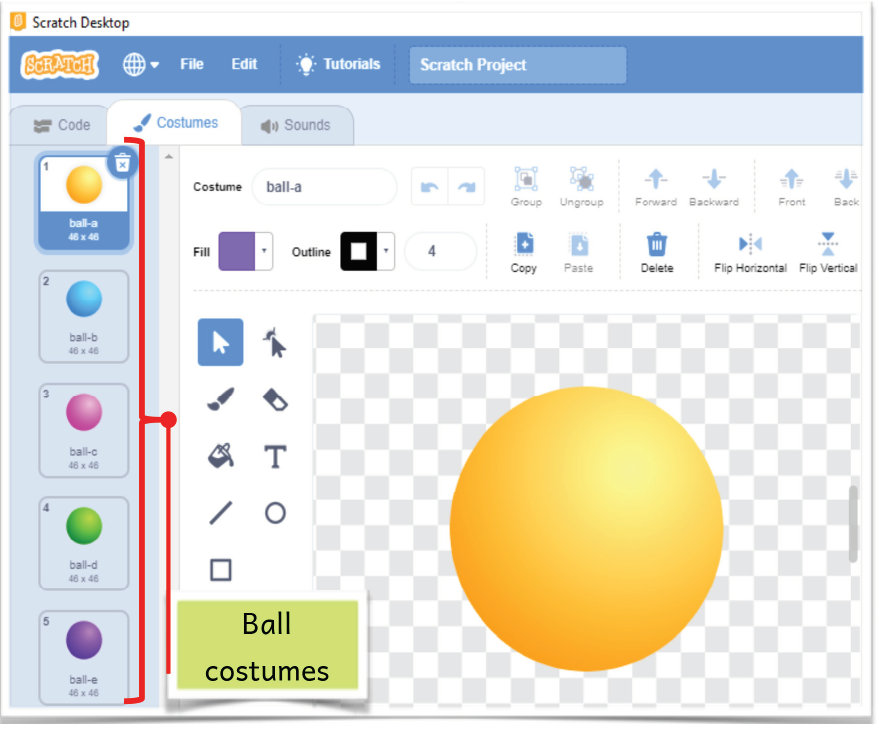
Activity 4.37: Creating an Animated Ball Game Sprite
- Open Scratch program and select the Ball sprite.
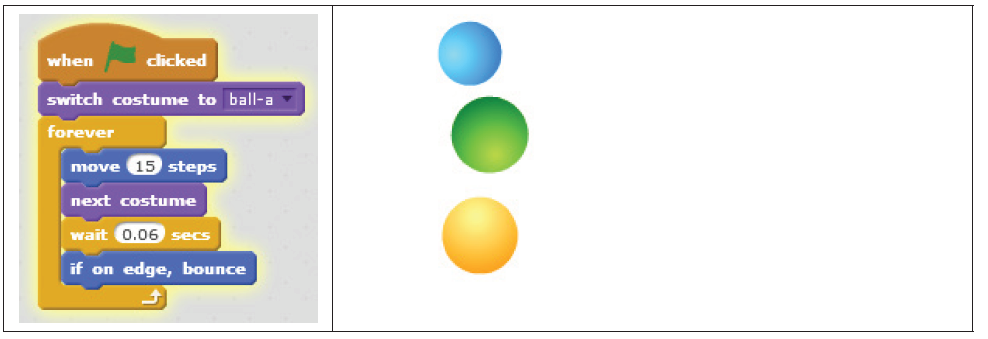
- Click on the Costume tab to display the different costumes for the Ball sprite. Create the script as shown below and save it as Ball.
Activity 4.38: Animating the Ball
- Open the Ball Sprite you created in Activity 4.37.
- Click on the Green Flag button to see the animations of the Ball Sprite.
- The Ball Sprite will be animated.
Activity 4.39: Creating a simple animation in Scratch
Work safely in pairs. Do the following:
- Open Scratch program and insert a Sprite of your choice.
- Create a simple script to animate the selected sprite.
- Click on the Green Flag Button to run it.
- Discuss the animations that have been applied on the Sprite.
Learn more. Grow. Share the knowledge with your family and community members
- Costumes are used to apply animations to Sprites.
- Various blocks can be arranged to create animations.
- Sprite can have many costumes.
- Some Sprites do not have costumes.
Creating simple games and graphics for enjoyment
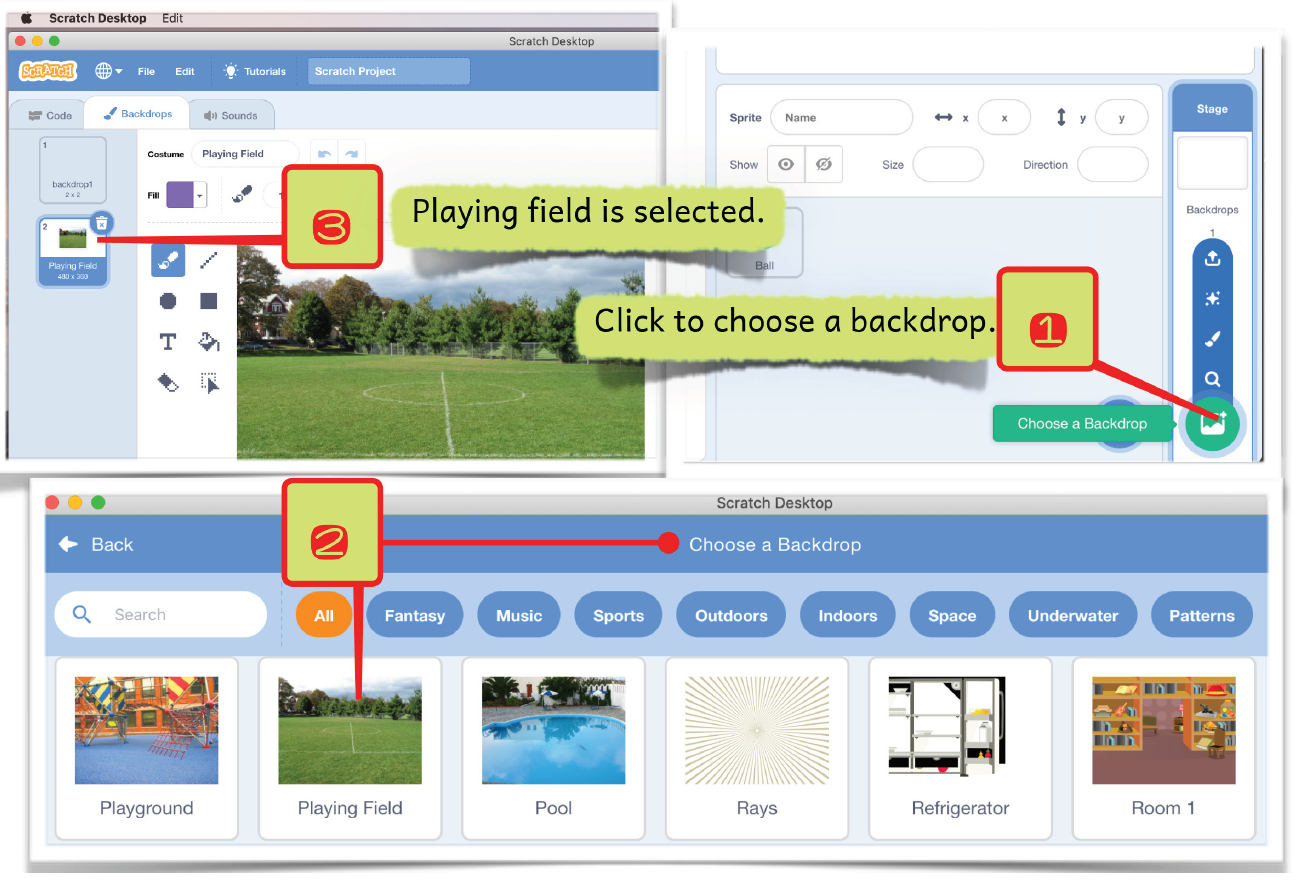
Activity 4.40: Adding a playing field to a ball game
Open Scratch program. Follow steps 1 to 3 shown in this picture:
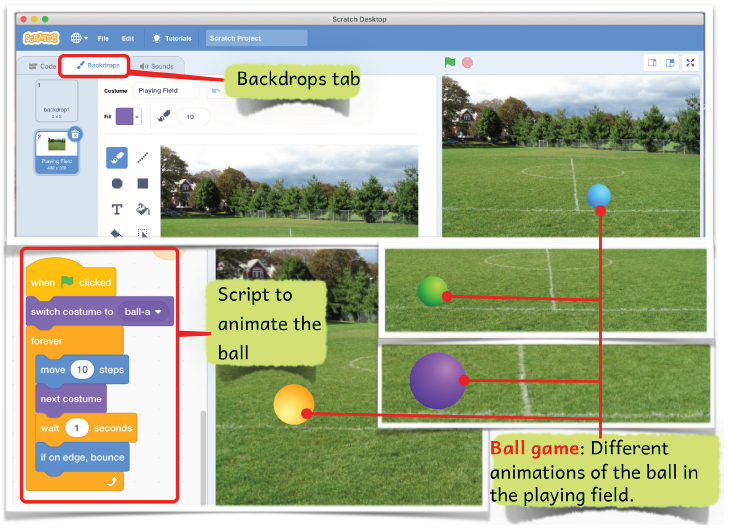
Activity 4.41: Animating the ball and moving it across the field
- Open the Playing Field you created in Activity 4.40.
- Click the Green Flag to animate the ball. The ball will change its colour and move across the playing field.
Learn more. Grow. Share the knowledge with your family and community members
- More than one Sprite can be used to create a game.
- Backdrop options are used to change the appearance of the stage area.
- A new Sprite can be added by painting.
- When creating a game, each Sprite has its own script or scripts.
Watching online video tutorials on how to create simple games and graphics
Activity 4.42: Creating simple games and graphics using online video tutorials
Work in groups of four:
- Connect to the Internet.
- Search for online video Scratch tutorials.
- Find out how to create simple games and graphics.
- Use the search phrase Scratch Online Video Tutorials. Watch the videos. Practise what you learn. Share the knowledge with others.
Project
- Open Scratch program. Select a sprite of your choice with at least four costumes. Add a script to the sprite to animate it.
- Ensure that the Sprite costumes display messages while they are playing. Share your game, graphic, story or animation with others.
Learn more. Grow. Share the knowledge with your family and community members
- Sprites are images. Use more than one to create your story or game.
- Change the appearance of the stage area. Use the Backdrop options.
- Scripts are instructions. Use them to create movement. Use them to create animations in your games and stories.
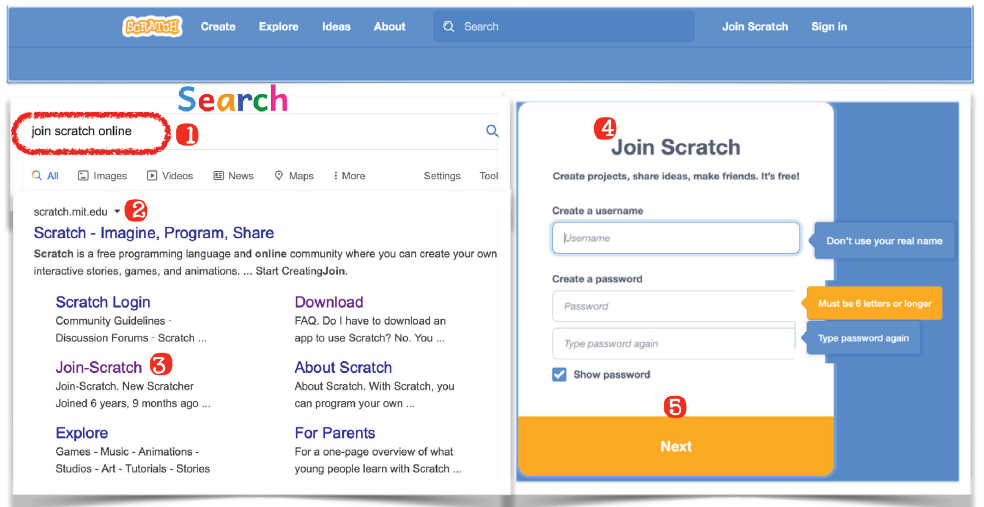
Activity 4.43: Join the Scratch Community online
- We downloaded Scratch at the beginning of these learning activities.
- This offline Scratch version allows you to create projects without the Internet. It is free. With Scratch, you can create stories, games, and animations and share them with others worldwide.
- To learn more about using Scratch Online, search the Scratch page. Ask an adult to help you. Follow steps 1 to 5 given below.
- Create games, graphics, stories and animations. Share with others.
Symmary: Scratch features
These are the different features of the Scratch window you will use to do different things.
